In the fall of 2019 I submitted a Faculty Research Grant proposal to fund an idea that had been developing for years. The grant request was awarded, with funding beginning July 1st, 2020. Included here is a record of the entire process, beginning with the initial idea from 2016. Photo galleries are imbedded throughout to provide additional clarification.
IDENTIFYING THE PROBLEM
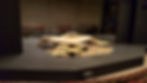
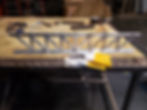
When I began as ATD at the University of Wisconsin - La Crosse, our shop was fully stocked with a terrific set of 4x8 platforms...stored across a parking lot in a shed. No other storage solutions were available in the shop or stage areas. Winters were rough. Upon taking over as TD, I switched our shop to using Triscuits, and built a cart-full that could hang out in the backstage area and shift around as needed. But many of our designs required levels built over head with open access underneath, so we frequently relied on custom builds with 2x8 joists with plywood decking. When we began talks for the design of The Importance of Being Earnest, I started toying with the idea of building a steel "K'nex" set to work with Triscuits for a modular decking system - my scenic design involved creating a 16'x24' wagon that would roll offstage for Act 2 and back on for Act 3, allowing for an easy transition to and from interior settings.
MY FIRST SOLUTION
Click on image to open a gallery
I had plenty of students experienced in welding steel at this point, so my student ATD and I set to work thinking about how to make 4' and 8' (nominal) trusses that could connect both at 45 and 90 degrees. We came up with some cool connector pieces 6" and 12" in length, and designed the trusses at 3'-6" and 7'-6". The idea was that any frame could be assembled entirely of this set of connectors and trusses using bolted connections, and that Triscuits would then attach via a 2x2 nailing plate bolted to the top chord of the truss.
The trusses were made from entirely 1" square tubing, which I realize is overkill for the diagonals, but it made jig creation so much easier!

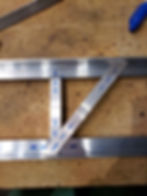
Drawing showing the configuration of 3'-6" and 7'-6" trusses with a variety of connectors, as well as placement of zero-throw casters.

Design of steel connectors

Because the frame was entirely steel, there was no room for adjustment, which did require that we work from the center out and fudge the placement of Triscuits as we went.
Drawing showing the configuration of 3'-6" and 7'-6" trusses with a variety of connectors, as well as placement of zero-throw casters.
WHAT I LEARNED FROM SOLUTION #1
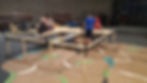
In theory, the steel set worked. We were able to reconfigure the pieces into an entirely different set in just a few hours (Theory of Relativity, pictured below). But I learned of quite a few flaws in the process:
For a production of "Theory of Relativity"

UWL students work on bolting legs to individual trusses.
Installing Triscuits
For a production of "Theory of Relativity"
-
It was simply too heavy. The giant wagon for The Importance of Being Earnest took four people to move and became a production of its own during intermission!
-
Bolting steel to steel is great when you have the precision capabilities to ensure the holes are going to line up. Unfortunately we do not possess the tools, time, or consistent abilities to make that happen, which greatly slowed down the bolting process.
-
Storage of both the trusses and connectors was cumbersome. The connectors were awkwardly shaped, making them impossible to stack neatly.
Click on image to open a gallery
THE PROPOSAL FOR SOLUTION #2
Since there were enough flaws to make me consider a complete redesign, I decided to pursue a Faculty Research Grant in order to learn how to work with aluminum instead. The basic premise for my proposal was that although aluminum would certainly help with the problem of weight, I did not know if it would be worth it to (1) learn to work with aluminum, (2) pay the additional cost over steel, and (3) pursue the idea of a modular support system at all. Would it be more cost- and time-efficient just to stay with wood construction? Should we instead be focusing our efforts on integrating other construction industry materials such as I-Joists or other engineered floor beams? And even though I approach each production as an opportunity to research new methods and ideas, this was one that I was not entirely sure I could achieve - with the time and budget constraints of a typical production, or even at all. Having a grant to fund the materials and allow me time in the summer to work on the project was incredible, as it alleviated a great deal of the usual pressures.
THE PROCESS
My goals for getting started included learning about various styles of trusses (such as Pratt and Warren), calculating loads on trusses, getting comfortable with both cutting and welding aluminum, and then designing some prototypes. Here's what I learned:
Trusses: Both Pratt and Warren style trusses seemed to be solid choices for this design. I also learned some basic principles such as minimal suggested span to depth ratio of 10-15 (so for an 8' truss, an appropriate depth would be at least 6 1/2") and that the diagonals should be between 35 and 55 degrees. The span to depth ratio gave me initial concern because I was trying to keep the trusses to an overall depth (or height) of 5 1/2" - since we used 2 1/2" thick Triscuits in our shop, this would make it easy to create 8" levels. However it is just as easy to use 2x6 on edge anchored to the floor if we truly need to keep such a minimal profile.
Cutting, Cleaning, and Welding Aluminum: Cutting aluminum is amazingly simple. Using an 80T Diablo blade on a 10" Dewalt Miter Saw, it has none of the fanfare of cutting steel with an abrasive saw, but does require spraying WD-40 on the piece prior to cutting. Once complete, each cut is smooth and ready to go with no extra step of grinding. To clean the aluminum after cutting, wipe it down with a rag and some acetone. Be sure to wear appropriate PPE. Welding, however, was another matter. I had previously been taught the basic process, so I delved right in with some practice welds; unlike with steel, which to me was fairly intuitive to learn, I had absolutely no idea if what I was doing was correct. I tried several different thicknesses and shapes of materials, and it all appeared as if it was going...okay? A few weeks later once classes resumed, I recruited a few students to try it out, and we all felt the same way - completely unsure of the quality of our work. Testing was fun - trying to bend apart joints and throwing welded objects off the dock brought us joy and taught us that our intuition was correct; our welds were inadequate. And once I started reading more about working with aluminum, I learned the most pertinent fact - welding aluminum weakens the area around the joint, which means even if I were to become an expert welder (not possible on my own), the integrity of the material would be sacrificed. One of my students, Addison Skeels, tested out this theory by hammering a punch into the area around a weld to prove it was weaker.
Choosing Materials: I had believed I would be starting with a similar design to the steel, using some variation of box tubing as the chords. Once I realized that welding was not a viable option, I decided to consider the alternative of through-bolting, which led me to wonder how easy it would be to crush box tubing while tightening a nut. The answer is that it is VERY easy. Knowing that some of our students would be a bit over-zealous, I knew this had to be a design consideration, which led me to think about angle and flat bar.

Let's see how easily the walls of the aluminum box tubing crush using an impact driver!

The aluminum box tubing is quickly dented from using an impact driver to tighten the nut.

The torque settings on a drill are a great solution, but only if the students remember to use them!
Let's see how easily the walls of the aluminum box tubing crush using an impact driver!
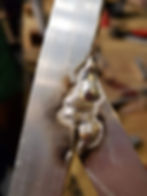
This is a weld that I did after feeling more or less comfortable with the process, but clearly needing some work still. From a visual observation I felt that the weld was sufficient to hold the two pieces of box tubing together permanently.

Not only did the weld not hold, but the area of the box tubing directly next to it (in the weld-affected zone) essentially tore apart.
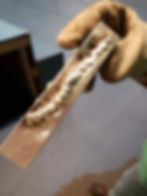
UWL student shop staff, Addison Skeels, showing the results of a hammer and punch at various distances from the weld he just completed. The weld-affected zone is extremely malleable!
This is a weld that I did after feeling more or less comfortable with the process, but clearly needing some work still. From a visual observation I felt that the weld was sufficient to hold the two pieces of box tubing together permanently.
Designing Prototypes: Though I had finally made a decision about materials and a truss style, I was still unsure how I wanted the whole "set" of trusses to work. I had learned from the steel set that relying on holes in metal to line up was a terrible idea, so I began investigating how "strongbacks" are used to connect floor trusses in general construction. I realized that the trusses could be individual spans that then connected laterally using 2x4 bolted in place for each installation, making it both easier and more flexible.
Click on image to open a gallery
Click on image to open a gallery
Click on image to open a gallery
Calculating Loads on Trusses: I was thrilled to discover that the second edition of Structural Design for the Stage had recently come out with a chapter on aluminum. While I waited for my new copy to arrive in the mail, I worked on calculating the loads on the trusses given various depths and spans. I put this into a spreadsheet using one of the examples provided in the book to ensure it was calculating correctly. I assumed a 200#/linear foot load, accounting for Triscuits and humans, which is excessive - an 8' truss would hold the weight of two Triscuits (assuming this truss is located at a seam) weighing a total of 120#, which then allows for 1480# of human weight directly on each truss. But given my lack of engineering expertise I always prefer to overdesign when it comes to structure and safety! As the fall 2020 semester began, I continued working through calculations while still playing with aluminum and considering various overall designs for the complete set.
One of the first attempts at welding a Pratt truss, experimenting with different materials.
Regardless of style and material, it is important to remember that layout of a successful truss requires lining up the central axes of each member so that they meet at each joint.

In trying to decide how to best utilize flat bar and angle to create the trusses, I experimented with a bit of foam core. At this point in the design I was also interested in looking at ways in which each of the trusses would connect to one another.
One of the first attempts at welding a Pratt truss, experimenting with different materials.

Putting Calculations into Practice: Once I used the Method of Joints as outlined in Structural Design for the Stage, I started to notice my own lack of understanding. For example, once I drafted the truss using the correct width of each member rather than simple vectors, it became apparent that the overall height of the truss would need to change in order to maintain the dimensions calculated. The alternative was to redraw the desired truss with the correct width of members included, then draw the vector representation of the central axes in order to perform the calculations.
Choosing Members: In order to accurately calculate the loads, therefore, it became necessary to choose the materials for each member. This is where I realized my level of training in structural engineering was not going to be sufficient. In hopes that I would eventually work through the process successfully on paper, I placed an order for a few different sizes of both angle and flat bar so that I could get started with a more complete prototype of trusses. Each time I returned to the book, I uncovered more and more holes in my knowledge that set me back. Although I loved working through Structures when in grad school, I have found that it is no longer a passion to which I am able to fully devote my time and attention. I have yet to complete the process of determining if the members I selected for my truss are meet all the requirements of the design, and I am now at a point where I hope to find others willing and able to carry on that torch. I originally intended to share my calculations on this website, however that would be irresponsible since I am certain there are errors in my work; please contact me if you would like to see anything I have done.
THE FIRST ROUND OF ALUMINUM TRUSSES
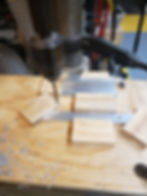
After cutting and cleaning the flat bar and angle, the next step was to drill holes in the diagonals only, using a simple jig for the drill press to ensure consistency. Then came the process of creating a jig to layout and assemble a single truss (with only one set of chords). I began the process as a typical jig flat on a long stretch of plywood, spacing out the diagonals, then added a second layer on top for the verticals. This proved too difficult to remove the diagonals and would have required the truss to be assembled outside the jig.
I enlisted two students - Nathan Literski and Sam Kallis - to assist me in designing a new jig. The next version lofted the entire project so that through-bolting could happen in place. The photo gallery here visually explains the process, though I am happy to answer questions and provide tips to others who may wish to pursue this design!
Click on image to open a gallery
We knew if we drilled in advance in ALL the pieces, they would never line up. Using a jig to drill the holes in the diagonals only ensured they were in the right place; we then used a corded drill to go through the remaining materials.
When assembling it is important to layout the entire jig before attaching any pieces. If the jig blocks are off by a hair, the whole layout will be off.

Taking a moment to be proud of our work - including the many lessons we learned along the way!
We knew if we drilled in advance in ALL the pieces, they would never line up. Using a jig to drill the holes in the diagonals only ensured they were in the right place; we then used a corded drill to go through the remaining materials.
Click on image to open a gallery

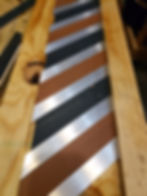
Note that the angle is not yet attached to these for lateral bracing.

Through-bolting 2x4 to the trusses as lateral bracing.
Installing the Triscuits using carriage bolts was not working, as we couldn't fully drill a hole up through the chord and into the Triscuit. We eventually bolted on nailing plates instead, though using lag screws is the preferable solution.
Note that the angle is not yet attached to these for lateral bracing.
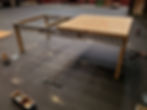
We assembled two single trusses (each only able to catch a perimeter rather than a seam), and bolted the 2x4 lateral bracing to each in order to connect them. We learned valuable lessons about hole placement through the process, but overall the assembly was quick and easy. The ultimate flaw in this design is the insufficient attachment of compression legs to the end of each truss; future iterations will explore recessing the angle at each end so that 2x4 lateral bracing can both connect the trusses and provide a location for through-bolting legs. We also discovered that bolting Triscuits to the 1-1/2" angle chords was difficult, as we could not get a drill in straight up through the chords. Because I also hate carriage bolts, the alternative solution was lag screws, which worked nicely.
FINDINGS: This is not a design we will continue to build. Each truss weighs 22# (versus a steel truss from the original design - only 20#!) and costs approximately $75. In order to address the weight and cost, we are currently starting work on a new design using a Warren style and expanding the height (depth) to 7-1/2". Though I am again unsure of my calculations, I am eager to build two trusses and test out their load capacity through hands-on use; if noticeable deflection occurs in the new design, we will simply add legs instead of keeping the full 8' span open. The many flaws in design regarding jig creation, bolting, and legging have also been taken into consideration, and will be addressed on this website as work progresses. I anticipate that more flaws will also be revealed in each iteration - we are therefore building only 6 of the next version (to fulfil the needs of an upcoming production) and will reevaluate once again before creating more. Thanks to the funding of this grant, we have enough materials to experiment with 2-3 additional styles in the remainder of the semester.
LOOKING TO THE FUTURE & WHAT I WOULD DO NEXT TIME
Despite my findings that the original design is insufficient, I continue to believe that the overall concept of creating a "K'nex set" is both worthwhile and achievable. I am pleased with the relative ease of construction in working with aluminum angle and flat bar, and I look forward to experimenting with various styles and designs. I am particularly interested in using this set of trusses in future scenic designs requiring raked stages or multiple levels over head.
If I could do this project over, there are several things I would do differently, all of which I could only have learned through the process of doing it "wrong" the first time around. I include these now in hopes that other Technical Directors or theatre technicians will learn from my mistakes and continue the work towards innovative, sustainable solutions for smaller theatres.
What I Would Do Differently:
-
Budget for consultations with a professional engineer! Most of the time Technical Directors build scenery within the realm of their structural engineering understanding, as we have experience (both our own and that of others) to rely on for guidance. When pursuing a project that is entirely new, it would be smart to bring in the professionals.
-
Allow myself more time for each phase of the project. Rather than assume I could do the calculations and design phase while simultaneously working hands-on to become familiar with the material, I would split these two endeavors up.
-
Enlist students right away! I always say I am an educator first and a theatre technician second (theatre is my "tool" for education), and the greatest joy I've found in this project has been through working with Nathan, Sam, and Addison (as well as Emily (Schmidt) Fisher back in the original steel design!). I have no recollection why I did not think to bring students on from the outset of the aluminum design, but I have absolutely learned not to repeat that mistake.
CONCLUSION (FOR NOW...)
I cannot say enough good things about the benefit of having a Faculty Research Grant to fund the time and materials for this project. We never have enough time or money in theatre, so this was a luxury that gave me more freedom than I have ever experienced in this career. I am always a bit overly ambitious in taking on challenging projects, but there is always a deadline of opening night to deal with, which necessitates back-up plans and knowing when to give up. On this project, I do not have to give up, and there are no repercussions for "failing". I highly encourage all theatre technicians to actively search out similar funding opportunities so that innovation can be less stressful and at lower stakes.
Special Thanks: In addition to the students who worked with me at various stages on this project, I would like to thank the following:
-
The University of Wisconsin - La Crosse for the opportunity to pursue research grants
-
The Research and Grants Committee for funding my proposal
-
My colleagues who reviewed the grant proposal prior to submission
-
The Department of Theatre Arts (UWL) for their unending support
BRIEF UPDATE OCTOBER 2021:
IT WORKS AS A RAKE! On our recent world premiere, the director Greg Parmeter asked if we could make an adjustment to the design by making all the platforms raked. I jumped at the chance to use the trusses in this way. Plus, it was a brilliant design decision that absolutely had to happen.


